Objects within the Tree Recycle Bin can be automatically deleted and/or purged on a scheduled basis by using the 'Schedule Empty Recycle Bin' feature. Recycle Bin emptying scheduling is similar to scheduling other processes in STEP (e.g., data imports, data exports, and bulk updates). The ability to schedule Recycle Bin emptying at designated times (e.g., overnight) frees users from time-consuming, manual tasks to empty the Recycle Bin, and allows the Recycle Bin to be regularly emptied with minimal or no user intervention.
The recommendation is to schedule emptying the recycle bin at least monthly and to include all contexts in use. The 'Data cleanup tools' healthcheck (defined in the Healthcheck Test Index topic of the Administration Portal documentation here) identifies when no schedule exists for emptying the recycle bin, or if the schedule is not as recommended.
Note: Scheduling is not available for the System Setup Recycle Bin since large numbers of objects are not generally deleted routinely from System Setup. For more information on the System Setup Recycle Bin, refer to the Recycle Bin for System Setup topic in System Setup documentation here.
Configuration
To set a schedule for emptying the Tree Recycle Bin:
-
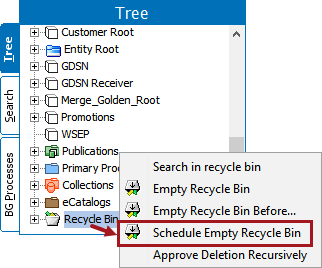
Right-click the Recycle Bin in Tree and select Schedule Empty Recycle Bin to display the Schedule Empty Recycle Bin wizard.
-
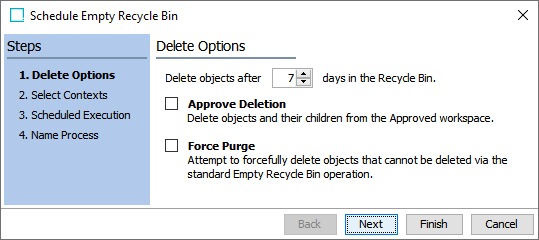
On the Delete Options step, set the following parameters:
-
Delete objects after __ days in the Recycle Bin: Enter the number of days that an object must be in the Recycle Bin before it is deleted. The default retention time value is 7. This means that process will only remove objects from the Recycle Bin that have been approve deleted for at least 7 days or whatever you have set the retention time to be.
Refer to the next bullet for additional Approve Deletion considerations.
-
Approve Deletion: Select this option to remove objects and their children from the Approved workspace, which sends a DELETEAPPROVAL event.
Considerations
-
The 'Approve Deletion' parameter is not affected by the value provided in the 'Delete objects after __ days...' parameter. As a result, when the Schedule Empty Recycle Bin operation runs, if 'Approve Deletion' is selected, all objects in the Recycle Bin are removed from the Approved workspace, even if they have not been in the Recycle Bin for the specified number of days.
-
When an object is removed from the Approved workspace via 'Approve Deletion,' a DELETEAPPROVAL event is generated for that object. However, if the object is subsequently purged from the Recycle Bin as part of the same Schedule Empty Recycle Bin operation, the event is also deleted, since the object that the event is related to no longer exists in the system.
Therefore, if an event-based OIEP is set up to be triggered on DELETEAPPROVAL events, it is recommended to schedule this OIEP to start at more frequent intervals than the Schedule Empty Recycle Bin process, since the DELETEAPPROVAL event may disappear before the OIEP is invoked. For example, schedule the OIEP to start every minute and configure the Schedule Empty Recycle Bin process to run once a week.
-
-
Force Purge: Select this option to attempt to forcefully delete objects from the Recycle Bin that cannot be deleted via the standard Empty Recycle Bin operation. For example, with this option, objects in the Approved workspace can potentially be force purged from the Recycle Bin without having first been removed from the Approved workspace through Approve Deletion.
Note: To use the Force Purge option, the user who configures the Schedule Empty Recycle Bin process must have the 'Force Delete and Purge' setup action included in their user privileges. For more information, refer to the Setup Actions and Error Descriptions topic in the System Setup documentation here.
-
Click the Next button.
-
-
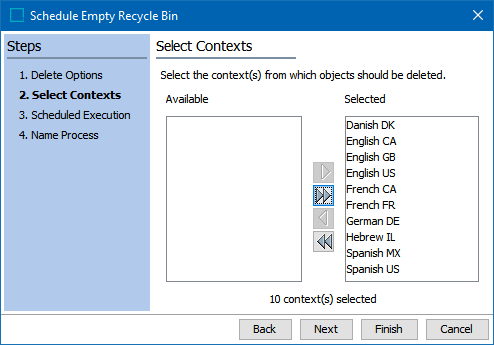
On the Select Contexts step, move the contexts from which to delete objects to the Selected list. It is recommended to include all contexts to ensure complete deletion of data. Click the Next button.
Note: In the rare instance that additional workspaces other than Main and Approved exist on your STEP instance, this step is named 'Select Workspace and Context' and a list of additional workspaces is displayed at the top of the wizard screen. Click the checkbox next to each workspace that you want to select.
-
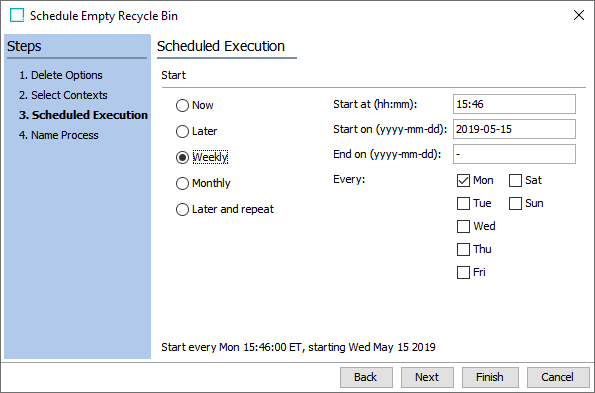
On the Scheduled Execution step, determine when and how often to empty the Recycle Bin. Click the Next button.
-
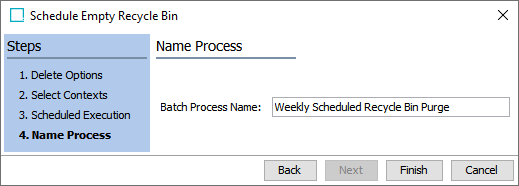
On the Name Process step, name the batch process for easy identification, and click the Finish button to complete the setup.
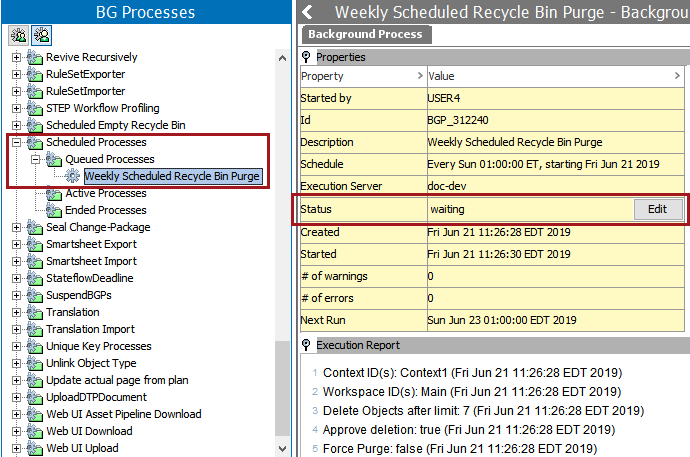
Scheduled Empty Recycle Bin processes are stored on the BG Processes tab (using the batch process name defined) under the Scheduled Processes node within Queued Processes. They display a status of 'waiting' and can be edited by clicking the 'Edit' button in the Status row.
Example
This is one example of how Schedule Empty Recycle Bin works:
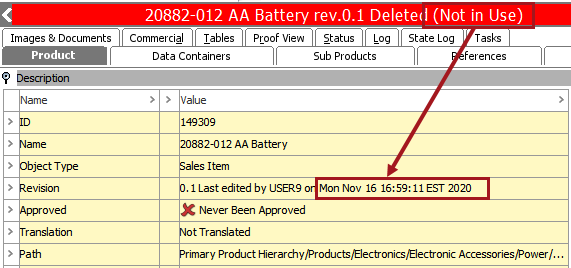
You have an object that has been sitting in the Recycle Bin for the default 7 days, but you have not approve deleted the item and you run 'Schedule Empty Recycle Bin' now with retention time of 1 day. The object will first be approve deleted, but it will not be removed from the Recycle Bin since it has only just now been approve deleted. If you then run 'Schedule Empty Recycle Bin' after, for example, 2 days, then that object will be removed from the Recycle Bin if it is 'Not in Use' and if last edit date is more than one day in the past. You can locate that information for an object as shown below: