Another required step in creating an eCatalog is to add an 'eCatalog Configuration'. This is an export configuration that specifies the data to be included in the eCatalog, as well as the data format of the eCatalog.
To create and configure an eCatalog Configuration:
-
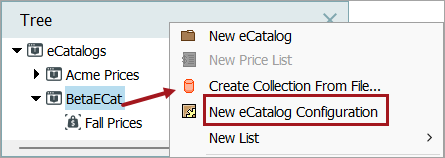
Navigate to the relevant eCatalog, then right-click and select New eCatalog Configuration.
-
The 'Configure eCatalog' wizard displays on the 'Select Format' step. The Configure eCatalog wizard is based on the Export Manager with added functionality, allowing you to map the prices from the price list information of the current eCatalog into the selected output format. You can choose among the following eCatalog formats, which are supported via export options (each is described in the Data Exchange documentation):
-
Excel Format:Files always include a header row and rows for data.
-
BMEcat Format: BMEcat 1.2 is an XML-based standard for electronic data transfer by electronic catalogs.
-
BMEcat 2005 Format: An XML-based standard for electronic data transfer by electronic catalogs.
-
Ariba CIF 3.0 Format: A simple comma-delimited list of catalog items and their attributes.
-
cXML Format: Exports data using Ariba cXML 1.2 and is an XML-based language designed specifically for communication of e-commerce business documents.
-
xCBL Format: Exports data using the CommerceOne XML-based language.
-
Configure an eCatalog Configuration for Excel
-
On the 'Configure eCatalog' wizard 'Select Format' step, select Excel from the dropdown list , then click Next.
-
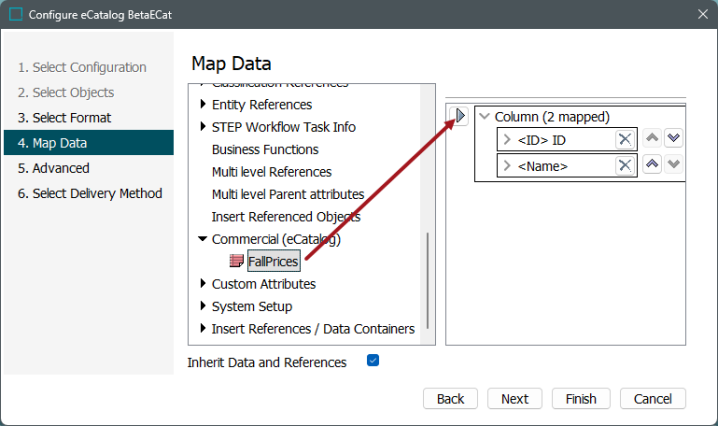
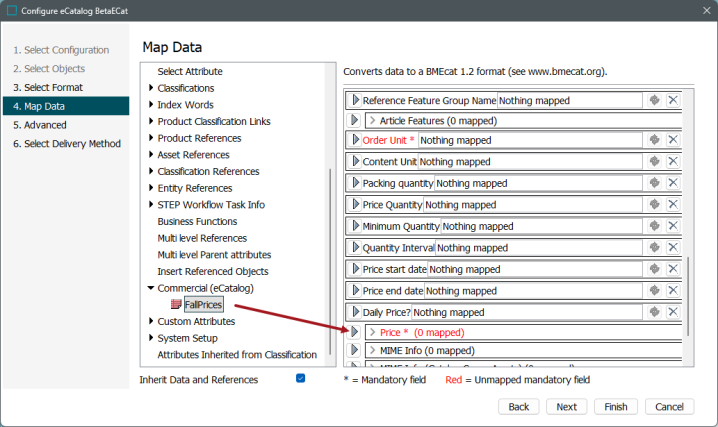
On the 'Map Data' step, click on the relevant information that you want included in the export (for instance, <ID> and <Name>), then click the arrow button on the right side of the window to add it to the list of data to be exported. At a minimum, you must map ID and a price column.
-
To map the required price data, expand 'Commercial (eCatalog)', select the relevant price list (in this example, 'FallPrices'), then click the arrow button to add it as a column in the Excel sheet.
-
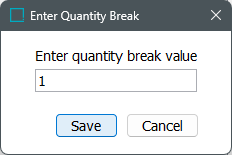
In the 'Enter Quantity Break' dialog that displays, enter the quantity break value (e.g., 1), then click Save.
-
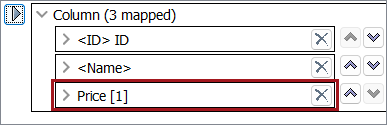
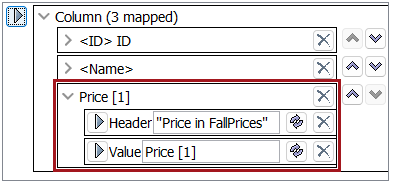
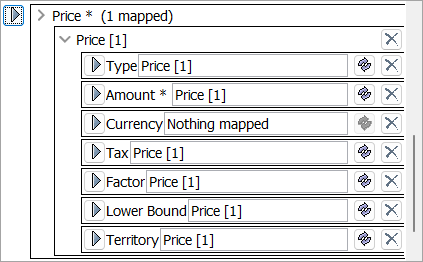
The price value is mapped, followed by the break number in brackets, e.g., [1].
-
To apply transformations to the values that display in the export, expand the Price row to view the fields that allow transformations via the transformation button (
 ). When mapping a commercial value, the same transformations are available for a product attribute, but the available aspects differ.
 For more information on applying aspect transformations to outbound data, refer to the Aspect - Transform Outbound topic in the Data Exchange documentation. For a broader overview on applying transformations to outbound data, refer to the Outbound Map Data - Transform topic in the Data Exchange documentation.
-
In the Header field, click the transformation button (
) to change the header that will display in the Excel export spreadsheet for the price value. In the 'Transformations' dialog, enter the desired header in the 'Source' field, then click Save. 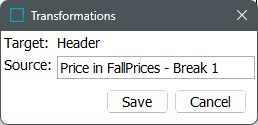
Note: If the header is not changed, then the header in the Excel sheet will be the same for all price breaks, e.g., 'Price in FallPrices.' As such, it is recommended to customize the header for each break, for example, 'Price in FallPrices - Break 1.'
-
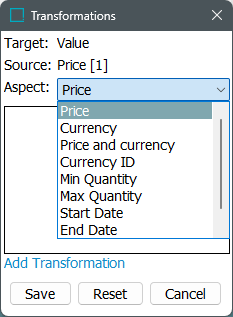
In the Value field, click the transformation button (
) to apply a transformation to the values that display in the price columns. The following Aspect selections are available:-
Price - default; the value field from the commercial list
-
Currency - the unit from the commercial list
-
Price and currency - both the value and the unit from the commercial list
-
Currency ID - the ID of the unit from the commercial list
-
Min Quantity - the Min. Quantity value from the commercial list
-
Max Quantity - the Max. Quantity value from the commercial list
-
Start Date - the Start Date value from the commercial list
-
End Date - the End Date value from the commercial list
-
-
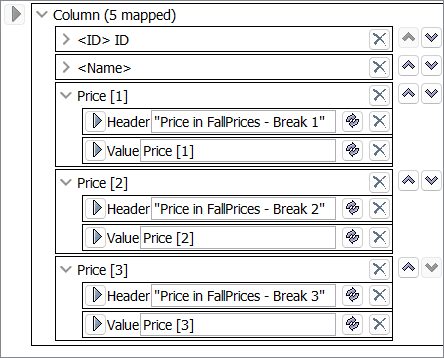
Repeat the process to map values from additional price breaks. The following image shows a sample mapping with ID, Name, and three price breaks with transformations applied:
-
Click Next on the 'Map Data' step when finished.
-
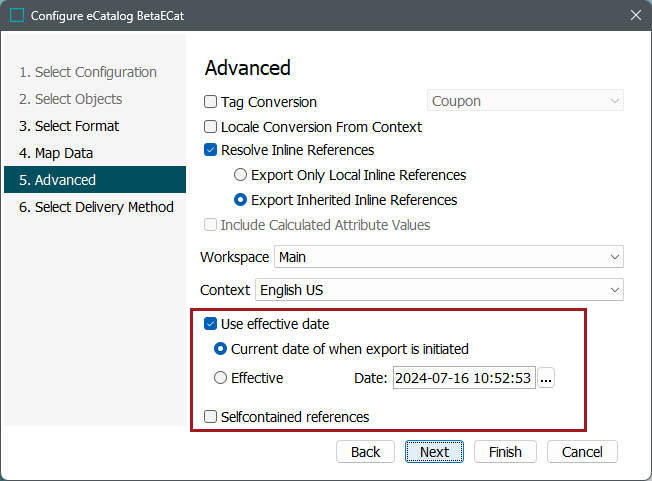
On the 'Advanced' step:
-
For information on the standard options available on this step, refer to the Export Manager - Advanced topic in the Data Exchange documentation.
-
Additional options specific to eCatalog exports are highlighted in the below image.
-
Use effective date: Select this option if you want the system to take the 'start date' and 'end date' specified on the price list into consideration when exporting prices. 'Use effective date' ensures that prices will only be included in the export if the effective date lies within the specified period. Leave this box unselected to have the system disregard the 'start date' and 'end date' applied to products on the price list.
If selected, specify one of the following options:
-
Current date of when export is initiated: Select to ensure that the prices included in the export have a start date that occurs on or before the date that the export is initiated. If the start date of a price on the price occurs after the current date, then that price will not be included, since it is not yet valid.
-
Effective: Select to ensure that the prices included in the export have a start date that occurs on or before the date specified. As with the 'current date' option, if the start date of a price on the price list occurs after the effective date, it will not be included in the export.
If no date span has been specified for the prices, the effective date will have no effect.
-
-
-
Selfcontained references: Select this option if there is a need for the export to be self-contained. This ensures that no references will be allowed to point to anything outside of the export.
-
-
Click Next to advance to the 'Select Delivery Method' step.
-
Select File, then click Finish.
Configure an eCatalog Configuration for BMEcat
For full details on configuring all of the information required for a BMEcat export, refer to the BMEcat Format topic of the Data Exchange documentation.
-
On the Configure eCatalog wizard 'Select Format' step, select BMEcat from the dropdown.
-
Fill out any relevant fields on the step, then click Next.
-
On the 'Map Data' step, the following mandatory fields are marked in red text with an asterisk: Supplier Article ID, Short Description, Order Unit, and Price. Since this guide concerns eCatalogs, the Price field will be mapped.
-
To map the price data, expand Commercial (eCatalog). Select the relevant price list (in this example, 'Price'), then click the arrow button next to Price to add it as a column in the Excel sheet.
-
In the 'Enter Quantity Break' dialog that displays, enter the quantity break value (e.g., 1), then click Save.
-
The price value is mapped, followed by the break number in brackets, e.g., [1].

-
To apply transformations to the values that display in the export, expand the Price row to view the fields that have the transformation button (
) available. When mapping a commercial value, the same transformations are available as for a product attribute, but the available aspects differ. The available aspects in the price transformations for the BMEcat format are the same as those available for Excel exports. Refer to the above subsection, 'Configure an eCatalog Configuration for Excel,' for more information.For more information on applying aspect transformations to outbound data, refer to the Aspect - Transform Outbound topic in the Data Exchange documentation. For a broader overview on applying transformations to outbound data, refer to the Outbound Map Data - Transform topic in the Data Exchange documentation.
Note: Commercial (eCatalog) > Price values can be mapped to other fields other than 'Price.' For example, You could map to the 'Minimum Quantity' field, then apply an Aspect transformation to pull the 'Min Value' value from the price list.
-
Click Next on the 'Map Data' step when finished.
-
On the 'Advanced' step, additional options specific to eCatalog exports are included in addition to the options available in the standard Export Manager. For information on the standard options available on this step, refer to the Export Manager - Advanced topic in the Data Exchange documentation.
The additional options for eCatalogs are the same as those available for Excel exports (User effective date, etc.). Refer to the above Configure an eCatalog Configuration for Excel section for more information.
-
Click Next to advance to the 'Select Delivery Method' step.
-
Select File, then click Finish.
Configuring eCatalog Configurations for Other Formats
The process for creating an eCatalog Configuration for other available formats (Ariba CIF 3.0, cXML, and xCBL) is very similar to that for creating configurations for Excel and BMEcat exports. Though the available data fields differ on the 'Map Data' step of the 'Configure eCatalog' wizard for each format, the process for mapping Commercial (eCatalog) > Price is the same, and the available aspects for transformations are the same. Additionally, the same options ('Use effective date,' etc.) are available on the 'Advanced' step.
Editing an eCatalog Configuration
-
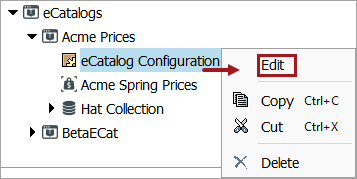
To edit an eCatalog Configuration, right-click the configuration and select Edit.
-
The 'Configure eCatalog' wizard displays. Follow the same steps as you would when creating a new configuration.