In ‘Select Import Location’ screen, you specify where the file or folder is located that contains the assets to be uploaded into STEP. This is also where you specify whether or not the asset file name should be used as the asset’s ID in STEP (as well as the name).
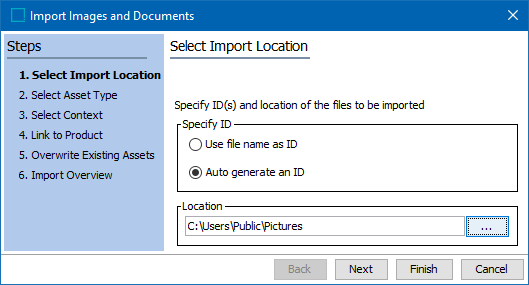
- For Specify ID, select to use the asset’s file name as the asset’s ID in STEP or auto generate the STEP ID.
Note: By default, “Auto generate an ID” is selected and once the Asset is imported, an automated ID is specified as an ID whereas the name will be the Asset file name itself.
When selecting your ID specifications:
- When ‘Use file name as ID’ option is selected, we can avoid duplicate of assets of same name being uploaded to STEP.
- When ‘Auto generate an ID’ is selected, we cannot identify the duplicate assets being uploaded since the same asset will be present in STEP but with a different STEP ID.
- For Location, click the ellipsis button (
 ) and use the file browser to navigate to the location of the assets that will be uploaded. You can upload multiple assets by selecting a folder and not just an individual asset. All assets in the selected folder, and any assets in any child folders to the selected folder are uploaded. All assets within the selected folder are loaded to the location you specified before starting the wizard.
- Click Next to continue.
Note: The user will be able to select an asset which is either in the local desktop or in a network to which the local desktop has access.