All steps in this section apply to Across, SDL, and Lionbridge services except in the Server Connection Details parameter, which is broken out by service.
Note: For information regarding configuring an Asynchronous File Exchange Service, refer to the Configuring an Asynchronous File Exchange Service topic.
Prerequisites
-
For the Across Translation Server software only, before performing the Configuration below in STEP, create a 'STEP' document template on the Across server using the 'Tagged XML v2' option. This template enables Across to read STEPXML files. For more information, contact Across support.
-
For any asynchronous service option other than File Service Exchange, prior to configuration, clicking the Server URL dropdown parameter displays the required property name. Provide a selection for the dropdown parameter via the sharedconfig.properties file on the STEP application server using the appropriate case-sensitive property:
-
Async.Kernel.Config.Across.ServerURL
-
Async.Kernel.Config.LionBridge.ServerURL
-
Async.Kernel.Config.SDL.ServerURL
-
The following is an example of a complete property entry for two Across systems:
Async.Kernel.Config.Across.ServerURL=1=http://across.scloud.com/crossAPI/crossAPI.wsdl,2=http://across.scloud2.com/crossAPI/crossAPI.wsdl
Note: Across Translation Server software users have the option to add a custom port for communication between STEP and Across Translation Server software by adding the port to the property entry within the sharedconfig.properties file. For example, in the property entry shown below, the '5000' is the custom port.
Async.Kernel.Config.Across.ServerURL=1=http://127.0.0.1:5000
Configuration
-
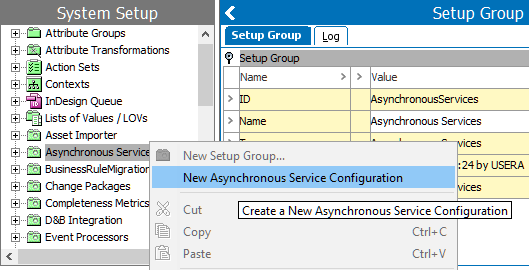
In System Setup, right-click the Asynchronous Services root node and select New Asynchronous Service Configuration.
-
In the Asynchronous Service Configuration Wizard, complete the parameters on the Service step based on the required service:
-
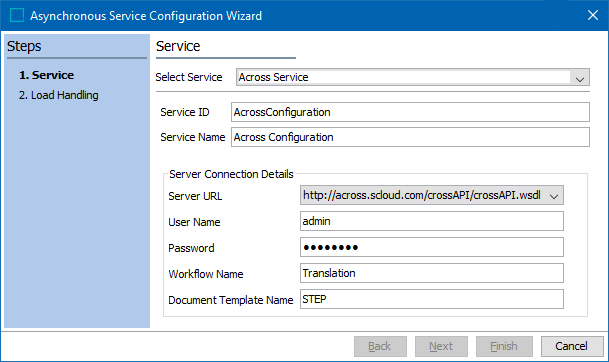
For a local Across translation server, enter your own values for the parameters as shown in the example below:
-
Select Service - Select Across Service
-
Service ID - Enter the service ID
-
Service Name - Enter the service name for your Across server
-
Server URL - Select the Across server URL from the dropdown
-
User Name - Enter the user name to communicate with Across
-
Password - Enter the password for Across
-
Workflow Name - Enter the name of the workflow in Across that will be used for the configuration. In this example the name of the Across workflow is 'Translation.'
-
Document Template Name - Enter the name of the Across document template you created in the Prerequisites section. In the image above, the Across document template is named 'STEP.'
-
-
-
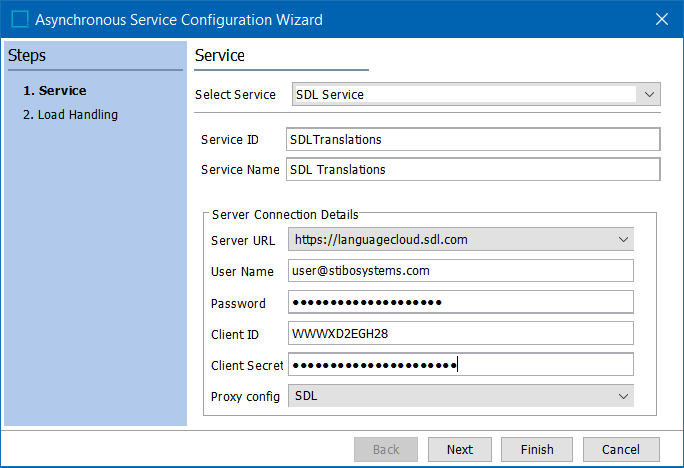
For SDL translation service, most of the information in the Server Connection Details of the Service step is provided by SDL. Enter your own values for parameters as illustrated in the image below:
-
Select Service - Select the SDL Service for SDL translations
-
Service ID - Enter a service ID
-
Service Name - Enter the service name for your SDL service
-
Server URL - Select the server URL for SDL from the dropdown
-
User Name - Enter the user name that will be used to communicate with SDL
-
Password - Enter the password provided by SDL
-
Client ID - Enter the client ID assigned to your application from SDL
-
Client Secret - Enter the client secret assigned to your application from SDL
-
Proxy config - Select 'SDL' from this dropdown if the connection must first pass through a proxy server with its own login requirement. For 'SDL' to show as an option and to successfully connect via proxy, the following properties need to be added to the sharedconfig.properties file (the values after the equal sign are examples and actual entries will differ):
Http.ProxyConfiguration.SDL.Host=localhost
Http.ProxyConfiguration.SDL.Port=8080
Http.ProxyConfiguration.SDL.User=user
Http.ProxyConfiguration.SDL.Password=password
-
-
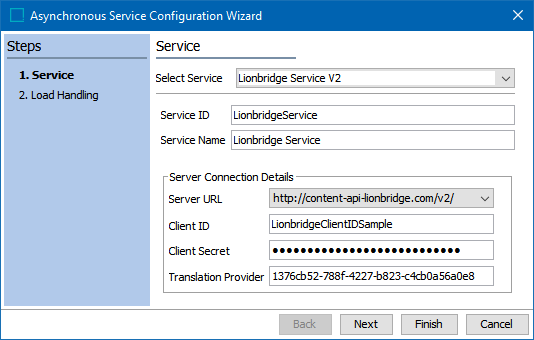
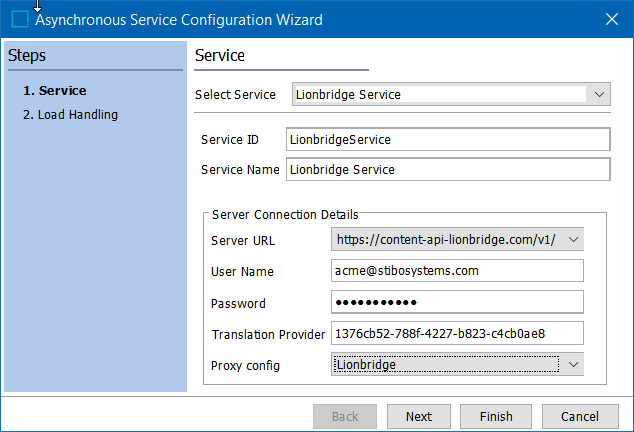
For Lionbridge translation service, most of the information in the Server Connection Details of the Service step is provided by Lionbridge. Enter your own values for parameters as demonstrated in the image below:
Note: If you are setting up a new service for Lionbridge, you must use Lionbridge Service V2.
-
Select Service - Select the Lionbridge Service V2 for Lionbridge translations
-
Service ID - Enter a service ID
-
Service Name - Enter the service name for your Lionbridge service
-
Server URL - Select the server URL for Lionbridge from the dropdown
-
Client ID - Enter the client ID assigned to your application from Lionbridge
-
Client Secret - Enter the client secret assigned to your application from Lionbridge
-
Translation Provider - Enter the translation provider key provided by Lionbridge
Important: Lionbridge is scheduled to discontinue support for APIv1 (shown below) in Q2 2022, and recommends existing customers contact their Lionbridge representative to access an APIv2 staging environment for testing purposes before using the new service on production systems.
-
Select Service - Select the Lionbridge Service for Lionbridge translations
-
Service ID - Enter a service ID
-
Service Name - Enter the service name for your Lionbridge service
-
Server URL - Select the server URL for Lionbridge from the dropdown
-
User Name - Enter the user name that will be used to communicate with Lionbridge
-
Password - Enter the password provided by Lionbridge
-
Translation Provider - Enter the translation provider key provided by Lionbridge
-
Proxy Config - Select 'Lionbridge' from this dropdown if the connection must first pass through a proxy server with its own login requirement. For 'Lionbridge' to show as an option and to successfully connect via proxy, the following properties need to be added to the sharedconfig.properties file (the values after the equal sign are examples and actual entries will differ):
Http.ProxyConfiguration.Lionbridge.Host=localhost
Http.ProxyConfiguration.Lionbridge.Port=8080
Http.ProxyConfiguration.Lionbridge.User=user
Http.ProxyConfiguration.Lionbridge.Password=password
-
-
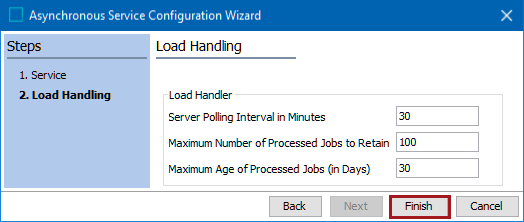
Click Next to move on to the Load Handling step.
-
For Load Handling, provide the following data:
-
Server Polling Interval in Minutes - The length of time, in minutes, the asynchronous service will poll the asynchronous translation service. The minimum is one (1) minute
-
Maximum Number of Processed Jobs to Retain - The maximum number of processed translation jobs to retain
-
Maximum Age of Processed Jobs (in Days) - The maximum number of days to retain a processed translation job
Note: The processed jobs are retained until either the maximum number of processed jobs or the maximum age of processed jobs limit has been met, whichever comes first.
-
-
Continue with the setup as defined in the Setting Up a Translation Configuration topic.
Additional Information about Lionbridge APIv2 Connector
The Translation Service Connector - Lionbridge commercial license is required to use this functionality.
When STEP receives translation jobs from Lionbridge API V2, the translation enters a ‘Quarantine’ state. The translation job resides in this state for 5 days before it is completed and archived. This interim time period allows the customer to review and, if necessary, send the translation job back for rework.
Execution reports have specific ID that Lionbridge uses to assist with errors. Also, error messages from Lionbridge will be written in the execution report. For example, if a requested language is not supported, a message in the execution report will address the unsupported language. Users can then contact Lionbridge for more support.
There is also additional support for proxy servers.