REST stands for Representational State Transfer. It is a software architecture style that you can use to design web services. REST as an architecture style does not require processing and is naturally more flexible. Unlike SOAP, REST does not have to use XML to provide the response. You can find REST-based web services that output the data as Comma Separated Value (CSV), JavaScript Object Notation (JSON), and Really Simple Syndication (RSS). The REST Receiver supported formats include XML files using STEPXML or Generic XML.
To learn more about REST, search for resources on the web.
For information about how to use the STEP REST API, access the Technical Documentation accessible at [system]/sdk or from the Resources section of the system's Start Page.
Prerequisites
The path used for the file upload is system specific and is automatically used when new REST receivers are created. In the configured path, a folder named REST is created and files uploaded using REST API appear in this folder. Each REST IIEP has its own 'failed' and 'save' folders.
When an IIEP has been configured to use the REST Receiver, files can be posted to the IIEP via HTTP POST to the following URL:
[Host]/restapiv2/inbound-integration-endpoints/[Endpoint ID]/upload-and-invoke?context=[Existing Context]&workspace=Main
The request header 'Content-Type' must have the value 'application/octet-stream' and basic authorization must be used. For example, the 'Authorization' header must have the value 'Basic ' combined with a 64-bit encoding of [Username]:[Password]. For example, 'Basic c3RlcHN5czpzdGVwc3lz.'
In the URL shown above, the context and workspace qualifiers have no significance, but they are required for the REST API.
The POST will invoke the endpoint, so there is no reason to schedule a REST-based endpoint. The resource for the REST POST invoke request is OpenID Connect Client Credentials Flow.
[Host]/restapiv2/inbound-integration-endpoints/[Endpoint ID]/invoke
Alternatively, on Stibo Systems SaaS environments, authentication can also be implemented using an OAuth Client Credentials flow. To implement this type of authentication, client credentials must be created in the SaaS Authentication broker and mapped to an existing STEP user account, as follows:
-
On the STEP side, create a service account user in the appropriate user group with the ID 'service-account-[client ID]' (e.g.: service-account-my-m2m-integration).
-
For the new service account user, assign a random and strong password.
-
Create a Stibo Systems Service Portal request and provide the service account user ID, the STEP system in question, and an email recipient for the OIDC details to have the client credentials created for this user account.
-
Test that using the client_credentials grant type, the client application can obtain tokens from the OIDC token endpoint that is specified in the response to the following URL:
[Host]/auth/.well-known/openid-configuration
Configuration
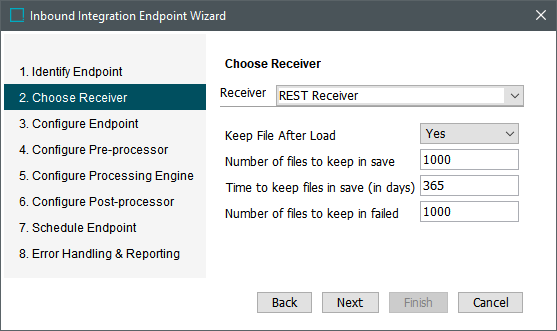
After completing the prerequisite steps, edit the receiver of the IIEP. Use the following parameters to configure the IIEP. For information on a parameter, hover over the parameter field to display help text.

-
For Receiver, choose REST Receiver.
-
For Keep File After Load, specify if files dropped in the hotfolder should be removed after they are processed. This option is available because files posted via REST are temporarily stored in a directory on the application server (under Hotfolder root).
-
Yes requires periodic manual cleanup on the server.
-
No removes the files automatically. Common setup is to select 'No' to prevent the need for manual cleanup.
-
-
For Number of files to keep in save, specify the number of files to be saved in the save folder after automatic cleanup, maximum allowed is 1,000 files.
-
For Time to keep files in save (in days), specify the number of days the files are saved in the save folder, maximum allowed is 365 days.
-
For Number of files to keep in failed, specify the number of files to be saved in the failed folder, maximum allowed is 1,000 files.
-
Click the Next button to continue with the IIEP - Configure Endpoint and subsequent steps.