The Dynamic JMS Receiver uses the Java Message Service (JMS) messaging standard to retrieve data from external systems. Unlike the JMS Receiver, the Dynamic JMS Receiver allows customers to supply the vendor-specific JMS libraries and JNDI configuration and, for example, upgrade to newer versions of these without Stibo Systems' involvement.
Important: This standard functionality only supports queues. Support for topics requires custom development via the Extension API (Technical Documentation accessible at [system]/sdk or from the Resources section of the system's Start Page). Alternatively, topics can be supported using middleware to move the message from a queue to a topic.
The receiver has been designed to work with any Java Message Service 2.0 specification-compliant client library (specification defined by JSR 343: https://jcp.org/aboutJava/communityprocess/final/jsr343/index.html), but will also work with systems that implement older versions of the specification.
Note: The receiver has been tested with the following message brokers: Apache Active 5.15.8 and RabbitMQ 3.7.10.
Prerequisites
Changes to the properties file or any files found in the class path directory, as outlined below, are implemented when the server is restarted.
-
Verify the jms-integration add-on component is installed by reviewing the 'About STEP' option on the Start Page. Enter your credentials and click the 'Detailed version information' link. For on-premises systems, instructions for installing components can be found in the 'SPOT Program' topic in the System Administration documentation found in 'Downloadable Documentation'. For Stibo Systems SaaS environments, contact Stibo Systems Support.
-
To enable the Dynamic JMS Receiver, the case-sensitive configuration property JMS.ClassPath must be set in sharedconfig.properties on the STEP application server and should point to an existing directory accessible from all application servers. Client libraries and JNDI files (Java Naming and Directory Interface) must be placed in this directory. Refer to the Dynamic JMS Configuration Examples section below for more information.
Once the server-side configuration is in place, the Dynamic JMS Receiver can be configured via the workbench.
Configuration
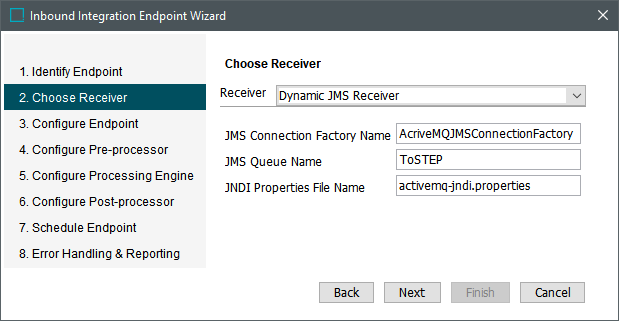
After completing the prerequisite steps, edit the receiver of the IIEP. Use the following parameters to configure the IIEP. For information on a parameter, hover over the parameter field to display help text.
-
For Receiver, choose Dynamic JMS Receiver.
-
For JMS Connection Factory Name, specify a JMS connection factory name. The selection must match the entry configured in the JNDI file.
-
For JMS Queue Name, select the physical name of the JMS Queue to be used. The selection must match the entry configured in the JNDI file.
-
For JNDI Properties File Name, enter the name of the JNDI file.
-
Click the Next button to continue with the IIEP - Configure Endpoint and subsequent steps.
Dynamic JMS Configuration Examples
As outlined in the following examples, in any JMS implementation, you must:
-
Put client jar files in the classpath folder.
-
Write the JNDI properties file.
-
Configure the connectionfactory and queue in the IIEP receiver.
Important: In the JNDI file, secrets (like passwords) are not encrypted.
Azure Message Bus
Place these libraries in the directory pointed to by the JMS.ClassPath configuration property:
-
qpid-jms-client-0.61.0.jar
-
geronimo-jms_2.0_spec-1.0-alpha-2.jar
-
proton-j-0.33.10.jar
-
netty-buffer-4.1.77.Final.jar
-
netty-codec-4.1.77.Final.jar
-
netty-common-4.1.77.Final.jar
-
netty-handler-4.1.77.Final.jar
-
netty-resolver-4.1.77.Final.jar
-
netty-transport-4.1.77.Final.jar
Important: Although the main JMS library is qpid-jms-client-[version].jar, the other libraries (listed above) are also required as these are underlying dependencies. Failing to include all of these in the JMS classpath will result in error messages similar to this one: java.lang.NoClassDefFoundError: io/netty/util/concurrent/EventExecutorGroup
Note: Due to a change in the Qpid JMS client's implementation, version 1.6.0+ of this library is not compatible with STEP's Dynamic JMS integration.
In the JNDI properties file, add properties to set the context factory and map queues, setting connectionfactory = SBCF as shown below:
java.naming.factory.initial = org.apache.qpid.jms.jndi.JmsInitialContextFactory
connectionfactory.SBCF = amqps://[servicebus_name].servicebus.windows.net?jms.username=[username]&jms.password=[password]
Register queues in JNDI using the form:
-
queue.[servicebus_queue_name] = [servicebus_queue_name]
Example azure-jndi.properties file:
java.naming.factory.initial = org.apache.qpid.jms.jndi.JmsInitialContextFactory
connectionfactory.SBCF = amqps://pimtest.servicebus.windows.net?jms.username=RootManageSharedAccessKey&jms.password=4NzL79KOhmD8A9N8bA9QSTY3zxTHX9Hy1602xan0bqk=
queue.inbound-products = inbound-products
In the corresponding IIEP receiver, the JMS entries should have the following format:
-
JMS Connection Factory Name SBCF
-
JMS Queue Name [servicebus_queue_name]
-
JNDI Properties File Name [jndi_properties_file_name]
Example receiver configuration:
-
JMS Connection Factory Name = SBCF
-
JMS Queue Name = inbound-products
-
JNDI Properties File Name = azure-jndi.properties
For more information on the Qpid JMS client library, refer to https://github.com/MicrosoftDocs/azure-docs/blob/master/articles/service-bus-messaging/service-bus-java-how-to-use-jms-api-amqp.md
TibcoJMS
Libraries to be placed in the directory pointed to by the JMS.ClassPath configuration property:
-
Tibjms.jar
The 'tibjms.jar' file can typically be found in:
components/shared/1.0.0/plugins/com.tibco.jms.jmsclient_[VersionNumber]
JNDI file content (example – file to be placed in the same directory as the libraries):
java.naming.provider.url=tibjmsnaming://[server1]:[port1], tibjmsnaming://[server2]:[port2]
java.naming.factory.initial=com.tibco.tibjms.naming.TibjmsInitialContextFactory
java.naming.factory.url.pkgs=com.tibco.tibjms.naming
java.naming.security.principal=[username]
java.naming.security.credentials=[password]
Example receiver configuration:
-
JMSConnectionFactoryName='QueueConnectionFactory'
-
JMSQueueName='ToStep'
-
JNDIPropertiesFileName='tibco-jndi.properties'
With this configuration, use the connection factory ‘QueueConnectionFactory’ or the factory configured in the Kaazing Gateway 'factories.conf' file. Queue names can either be the name used in Tibco, or 'queue.[add_the_tibcoqueuename]' (which is needed when a topic exists on the JMS server with the same name as the queue you are trying to connect to).
Apache Active MQ 5.15.8
Libraries to be placed in the directory pointed to by the JMS.ClassPath configuration property:
-
activemq-client-5.15.8.jar
-
hawtbuf-1.11.jar
JNDI file content (example – file to be placed in the same directory as the libraries):
java.naming.factory.initial = org.apache.activemq.jndi.ActiveMQInitialContextFactory
java.naming.provider.url = tcp://127.0.0.1:61616
connectionFactoryNames = ActiveMQJMSConnectionFactory
queue.FromStep = FromStep
queue.ToStep = ToStep
java.naming.security.principal=admin
java.naming.security.credentials=admin
Example receiver configuration:
-
JMS Connection Factory Name = 'ActiveMQJMSConnectionFactory'
-
JMS Queue Name = 'ToStep'
-
JNDI Properties File Name = 'activemq-jndi.properties'
Apache RabbitMQ 1.11.1
In RabbitMQ, create the necessary Queue(s) and Exchange(s) to allow message publishing and error reporting. For more information, search the web.
Libraries to be placed in the directory pointed to by the JMS.ClassPath configuration property:
-
amqp-client-5.5.2.jar
-
fscontext-4.6-b01.jar
-
rabbitmq-jms-1.11.1.jar
Note: If credentials are to be provided, add them in the JNDI file as shown below since having the credentials in the .bindings file will not work.
JNDI file content (example – file to be placed in the same directory as the libraries):
java.naming.factory.initial = com.sun.jndi.fscontext.RefFSContextFactory
java.naming.provider.url = file:resources/jmsclasspath/

#Credentials
java.naming.security.principal = username
java.naming.security.credentials = password
'.binding' file content (example - file with this specific name to be placed in the same directory as the libraries):
# ConnectionFactory
ConnectionFactory/ClassName=javax.jms.ConnectionFactory
ConnectionFactory/FactoryName=com.rabbitmq.jms.admin.RMQObjectFactory
ConnectionFactory/RefAddr/0/Content=jms/ConnectionFactory
ConnectionFactory/RefAddr/0/Type=name
ConnectionFactory/RefAddr/0/Encoding=String
ConnectionFactory/RefAddr/1/Content=javax.jms.ConnectionFactory
ConnectionFactory/RefAddr/1/Type=type
ConnectionFactory/RefAddr/1/Encoding=String
ConnectionFactory/RefAddr/2/Content=com.rabbitmq.jms.admin.RMQObjectFactory
ConnectionFactory/RefAddr/2/Type=factory
ConnectionFactory/RefAddr/2/Encoding=String
ConnectionFactory/RefAddr/3/Content=localhost
ConnectionFactory/RefAddr/3/Type=host
ConnectionFactory/RefAddr/3/Encoding=String
# rabbitmqQueue01 Queue
rabbitmqQueue1/ClassName=javax.jms.Queue
rabbitmqQueue1/FactoryName=com.rabbitmq.jms.admin.RMQObjectFactory
rabbitmqQueue1/RefAddr/0/Content=jms/Queue
rabbitmqQueue1/RefAddr/0/Type=name
rabbitmqQueue1/RefAddr/0/Encoding=String
rabbitmqQueue1/RefAddr/1/Content=javax.jms.Queue
rabbitmqQueue1/RefAddr/1/Type=type
rabbitmqQueue1/RefAddr/1/Encoding=String
rabbitmqQueue1/RefAddr/2/Content=com.rabbitmq.jms.admin.RMQObjectFactory
rabbitmqQueue1/RefAddr/2/Type=factory
rabbitmqQueue1/RefAddr/2/Encoding=String
# Queue Name
rabbitmqQueue1/RefAddr/3/Content=rabbitmqQueue1
rabbitmqQueue1/RefAddr/3/Type=destinationName
rabbitmqQueue1/RefAddr/3/Encoding=String
rabbitmqQueue1/RefAddr/4/Content=true
rabbitmqQueue1/RefAddr/4/Type=amqp
rabbitmqQueue1/RefAddr/4/Encoding=String
# Exchange Name
rabbitmqQueue1/RefAddr/5/Content=rabbitmqQueue1
rabbitmqQueue1/RefAddr/5/Type=amqpExchangeName
rabbitmqQueue1/RefAddr/5/Encoding=String
# Routing Key (if apply)
rabbitmqQueue1/RefAddr/6/Content=rabbitmqQueue1
rabbitmqQueue1/RefAddr/6/Type=amqpRoutingKey
rabbitmqQueue1/RefAddr/6/Encoding=String
# AMQP Queue Name
rabbitmqQueue1/RefAddr/7/Content=rabbitmqQueue1
rabbitmqQueue1/RefAddr/7/Type=amqpQueueName
rabbitmqQueue1/RefAddr/7/Encoding=String
Example receiver configuration:
-
JMS Connection Factory Name = ConnectionFactory
-
JMS Queue Name = rabbitmqQueue01
-
JNDI Properties File Name = rabbitmq-jndi.properties
WebLogic JMS Connection
Libraries to be placed in the Workarea directory, which points to by the jmslasspath configuration property:
-
weblogic.jar
-
wlclient.jar
-
wlthint3client.jar
Important: Because STEP will attempt to use some classes that are in both the wljmsclient.jar and the wlthint3client.jar libraries, conflicts will generate. To prevent this conflict, use wlthint3client.jar library instead of the wljmsclient.jar library.
The weblogic-JNDI configuration includes:
java.naming.factory.initial=weblogic.jndi.WLInitialContextFactory
java.naming.provider.url=t3://localhost:7001
This includes the queue name of:
jms/TestQueue=jms/TestQueue
Example delivery method configuration:
JMS Connection Factory Name = weblogic.jms.ConnectionFactory
JMS Queue Name = jms/TestQueue
JNDI Properties File Name = weblogic-jndi.properties