Using the Amazon SQS Receiver allows data to be imported into STEP from an Amazon SQS queue on AWS. For Amazon S3 storage, choose FIFO or standard queues based on your integration needs. Generally, if Amazon S3 storage is used for large messages, standard queues are recommended since a message that points to the S3 location is placed on the SQS queue and the large file is placed on S3. To determine the best option for your implementation, search the Amazon SQS Developer Guide online for details on the 'FIFO queues' and 'standard queues' options.
The Amazon SQS queues require a file size of less than 256KB. Common setup is to use file compression (zip export file) to reduce the message size to meet this limitation. Amazon S3 storage account is required to handle files 256KB or larger. For more information, search Amazon S3 online.
The Amazon SQS Receiver option can work in conjunction with the Amazon SQS Delivery Method on an OIEP to move messages into and out of STEP via AWS.
To access the Amazon SQS Receiver, a license is required. Contact Stibo Systems for more information.
Prerequisites
Important: Prior to configuration, dropdown parameters that rely on a property are empty. Hovering over the dropdown or clicking a dropdown displays the required property name to configure. To display the value(s), in the Self-Service UI, select the environment, and on the 'Configuration properties' tab, configure the property for your system. Refer to the Self-Service User Guide for information about setting configuration properties, including the use of the ${CUSTOMER_SECRETS_ROOT} and ${CUSTOMER_CONFIG_ROOT} variables.
Allow a few minutes for changes made in the Self-Service UI 'Configuration properties' tab to display in the workbench.
-
For the 'Credentials profile' parameter, create a credentials file (which is used by both the OIEP Amazon SQS Delivery Method and the IIEP Amazon SQS Receiver) following the instructions at http://docs.aws.amazon.com/cli/latest/userguide/cli-config-files.html. Upload the credentials file (named 'credentials', without any file extension) in the Self-Service UI 'Configuration files' tab, as identified by the SQSCredentialsPath property configured below.
-
Configure the Server URL dropdown parameter using the SQSServerUrl property. For example, using this configuration, one server is displayed in the 'Server URL' dropdown:

-
Configure the Credentials Path dropdown parameter that includes the name of the credentials file using the SQSCredentialsPath property. If necessary, use a comma and increment the number to separate multiple paths as shown in this example:

-
For the 'Queue name' parameter, if necessary, create a new queue on the SQS server. Use the steps defined in the Amazon SQS Queue Configuration section of the Amazon SQS Delivery Method topic.
-
If necessary, establish the Amazon S3 storage account and create the required buckets. For details, refer to Amazon S3 on the web.
Contact Stibo Systems if you need assistance with setup.
Configuration
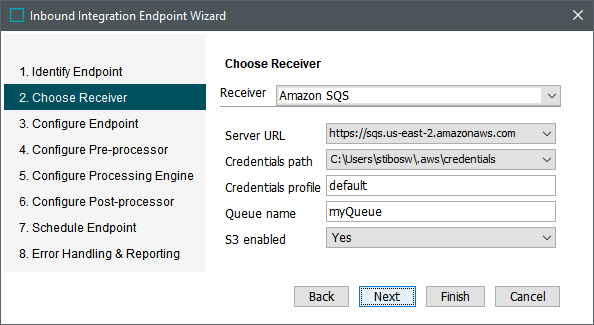
After completing the prerequisite steps, edit the receiver of the IIEP. Use the following parameters to configure the IIEP. For information on a parameter, hover over the parameter field to display help text.
-
For Receiver, choose Amazon SQS.
-
In Server URL, select the URL that points to the SQS server where the data will be delivered.
-
In Credentials path, select the path to the desired SQS credentials file.
-
In Credentials profile, enter the profile name included in the SQS credentials profile.
-
In Queue Name, enter the Amazon queue created for this delivery.
-
For S3 Enabled, select 'Yes' if you have an Amazon S3 storage account. Setting this option to 'No' results in an error for messages that exceed the 256KB size limit.
Note: Generally, if Amazon S3 storage is used for large messages, standard queues are recommended since a message that points to the S3 location is placed on the SQS queue and the large file is placed on S3.
-
Click the Next button to continue with the IIEP - Configure Endpoint and subsequent steps.