The JDBC delivery method allows STEP data to be delivered directly to tables in Relational database management systems (RDBMS) like Oracle, MySQL, MS SQL Server, and PostgreSQL. Though the ways the JDBC plugin can be deployed are various, one of its prime uses is to send STEP data to data analytics tools for the purpose of displaying STEP data in a data analytics dashboard. This delivery method requires CSV format and is available in both the Export Manager and in outbound integration endpoints (OIEPs).
To use this delivery method in an OIEP refer to JDBC Delivery Method topic.
Prerequisites
Important: For complete setup requirements, refer to the Exporting Data via JDBC with CSV Format topic.
Install the required drivers
JDBC specification 4.1-compliant drivers should be placed in a directory accessible from all application servers. These drivers can then be made available for the delivery plugin via the dynamic properties JDBCDeliveryPlugin.DriverPath.[n] and JDBCDeliveryPlugin.DriverClass.[n]. For more information regarding applicable Java drivers, review the RDBMS vendor's homepage on the web.
Configure data for the dropdown parameters
- Prior to configuration, clicking the Driver Location dropdown parameter displays the required property name. Provide a selection for the dropdown parameter via the sharedconfig.properties file on the STEP application server using the case-sensitive JDBCDeliveryPlugin.DriverPath.[n] property. As an example:
JDBCDeliveryPlugin.DriverPath.1 = L:/shared/mysql-connector-java-5.1.42-bin.jar
In this example, the drivers are stored on the application server's L:/shared drive.
- Prior to configuration, clicking the Driver Class dropdown parameter displays the required property name. Provide a selection for the dropdown parameter via the sharedconfig.properties file on the STEP application server using the case-sensitive JDBCDeliveryPlugin.DriverClass.[n] property. As an example:
JDBCDeliveryPlugin.DriverClass.1 = com.mysql.jdbc.Driver
In this example, the drivers class used is 'com.mysql.jdbc.Driver.'
- Prior to configuration, clicking the Database URL dropdown parameter displays the required property name. Provide a selection for the dropdown parameter via the sharedconfig.properties file on the STEP application server using the case-sensitive JDBCDeliveryPlugin.URL.[n] property.
JDBCDeliveryPlugin.URL.1 = jdbc:mysql://localhost:3306/mydb
In this example, the database URL used is 'jdbc:mysql://localhost:3306/mydb.'
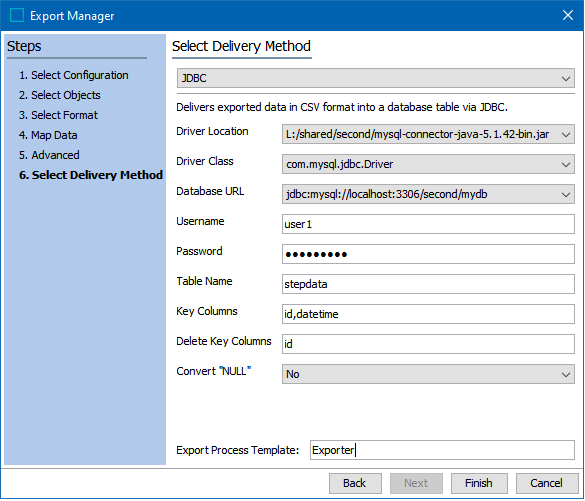
Configuration
For information on a parameter, hover over the parameter label to display help text.
-
In Select Delivery Method, choose JDBC from the dropdown.
-
In Driver Location, select from the dropdown one of the paths to the relevant .jar file.
-
In Driver Class, select from the dropdown one of the pre-configured driver class.
-
In Database URL, select from the dropdown one of the pre-configured URLs to the destination database.
-
In Username, enter the username required to access the destination database.
-
In Password, enter the password required to access the destination database.
-
In Table Name, enter the name of the table in the destination database to which STEP will be publishing data
-
In Key Columns, list the names of the columns appearing on both the exported CSV file and the table in the destination database, separated by commas (and no spaces), into which STEP will publish data
-
In Delete Key Columns, list the names of the columns appearing on both the exported CSV file and the table in the destination database, separated by commas (and no spaces), from which STEP will delete data. The headers contained in this field can differ from the headers in the 'Key Columns' field, but they must also be part of the upsert key definition.
-
In Convert "NULL", choose Yes if the string “NULL” should be converted to the value null. This may, for instance, be used for clearing a value in a column in the target database. This parameter defaults to No.
-
In Export Process Template, leave the default setting, which is required to start the background process for the export.
-
Click the Finish button to complete the wizard and begin the export as described in Running a Data Export.