The FTP delivery method allows an exported file to be delivered to an external system and is often used when the output files are large, or when a different or remote system is in use. The preferred method for FTP delivery is the SFTP secure delivery method.
For information on the SFTP delivery method, refer to the SFTP (Deprecated) Delivery Method topic.
To use this method in an OIEP refer to the FTP Delivery Method topic.
Configuration
For information on a parameter, hover over the parameter label to display help text.
-
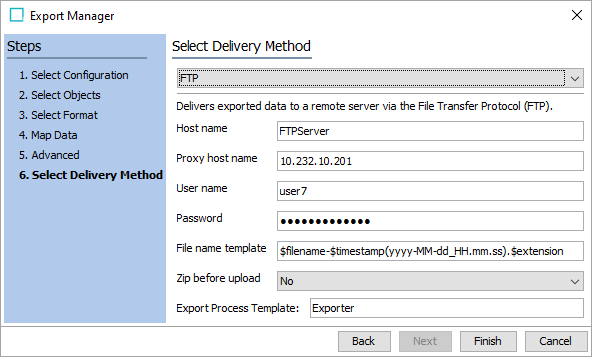
In Select Delivery Method, choose FTP from the dropdown.
-
In Host name, enter the host name or IP address of the FTP server to be used for the delivery.
-
In Proxy host name, add the host name to be used for the server proxy. This field is optional.
-
In User name, enter the user name that has access to log on to the FTP server.
-
In Password, enter the password that will be used to log on to the FTP server.
-
In File name template, to create the file name used for the output, enter template variables (identified with a $), static text, or use a combination of both. The default template is $filename-$timestamp(yyyy-MM-dd_HH.mm.ss).$extension. Depending on the settings of the configuration, the default template outputs a file name similar to 'GenericXML-2020-07-30_14.07.44.xml.' The hyphens (-), underscore (_), and the periods (.) are actual characters that are used to build the complete name of the exported file. Each variable is described below:
-
$filename: This variable is replaced with text to indicate the format of the delivered file as specified in the Output Templates section. For example, the output file name would include the text 'excel' or 'GenericXML' for those formats, or the Event ID for event-based STEPXML. Using the default file name template, a comma-separated value file would be named 'csv-1490808860412.csv' and 'GenericXML-1490810861593.xml' would indicate that Generic XML was used.
-
$timestamp: This variable is replaced with the time in year-day-month-hour-minutes-seconds-milliseconds, excluding the dashes. For example, 20161511094709625 is used for an export on 15 NOV 2016 at 9:47:09:625 AM.
Adding a definition for the arrangement of the date / time elements provides a way to generate a more readable date. Static characters can be included to separate the timestamp elements and individual elements can be ordered as required, as shown below.
Note: To revert the $timestamp variable so that it uses the legacy definition (milliseconds between January 1, 1970, and the time when the file is uploaded), contact Stibo Systems Support.
$timestamp(ddMMyyyy): The timestamp is modified to display day-month-year (excluding dashes) and is output as '15112016' for 15 NOV 2016.
$timestamp(yyyy-MM-dd_HH.mm.ss): The timestamp is modified to display year-month-day_hour.minutes.seconds (including the dashes, underscore, and periods) and is output as '2016-11-15_09.32.43' for 2016 NOV 15 at 9:32.43 AM.
-
$extension This variable is replaced with the extension of the output file based on the selected format in the Output Templates section. For XML-based formats, the output file is set with the .XML extension, while Excel files use .XLS, and comma-separated values use .CSV.
-
$uuid This substitution variable represents a universally unique identifier (UUID). A UUID typically follows this format: d36c9b1a-4c69-47e2-baa8-336af2e299e8. The variable can be used to generate unique filenames in delivery plugins, effectively preventing duplicates. This is particularly important in scenarios where multiple batches are processed, as it ensures that each filename remains distinct.
Note: The File Name Template does not support conversions of file formats and can only be used to deliver files in the format specified in the configuration.
-
-
In Zip export file, select an option from the dropdown to specify if the output file should be delivered in a .ZIP (compressed) file format.
-
Yes uses the File Name Template and the extension .ZIP. When a file is zipped, the File Name Template is used for the .ZIP file. The $filename template is replaced with 'result_0', and the selected file type is compressed with the name 'exported.' For example, a zipped STEPXML output with the default File Name Template exported on 15 NOV 2016 results in an output .ZIP file named 'result_0-1479230247017.zip.'
-
No uses the File Name Template for the file name along with the appropriate extension for the selected data format.
-
-
In Export Process Template, leave the default setting, which is required to start the background process for the export.
-
Click the Finish button to complete the wizard and begin the export as described in Running a Data Export.