Using the Import Manager, this example demonstrates how to take a JSON input document to create a template, then modify the template to resolve errors and accurately read the input, and prepare the data for mapping.
The following is an example of a JSON Import for a customer record that contains an ID, Name, and a Status attribute which uses "[?Source?]" instructions in the template. The Email Address and Phone Number object arrays included in the import example are mapped to data containers in STEP using the "[?MultiSource?]" instruction in the JSON template below.
Input Document
For this example import, copy the
Note: Any number of additional items can be included by repeating the data within the "Customers" array, but in this example, there is only one customer.
{
"Customers": [
{
"ID": "EXT-4500-01",
"Name": "John Smith",
"Status": "Active",
"Emails": [
{
"EmailAddress": "john.smith@stibosystems.com",
"Type": "Work",
"Unsubscribe": "false"
},
{
"EmailAddress": "john.smith@gmail.com",
"Type": "Personal",
"Unsubscribe": "false"
},
{
"EmailAddress": "jsmith@yahoo.com",
"Type": "Other",
"Unsubscribe": "true"
}
],
"PhoneNumbers": [
{
"AreaCode": "555",
"PhoneNumber": "4567890",
"Type": "Work"
},
{
"AreaCode": "555",
"PhoneNumber": "3239897",
"Type": "Mobile"
}
]
}
]
}Template
In the sample template:
-
Redundant objects in the "Emails" and "PhoneNumbers" arrays have been removed.
-
The "[?Instruction?]": "[?Record?]" definition is added inside the first object in the array.
-
"[?Source?]" replaces values for "ID", "Name", and "Status", using the optional identifiers in "Name" and "Status".
-
In the "Emails" and "PhoneNumbers" arrays, the "[?MultiSource?]" instruction is added in place of the values for each of the attributes within the respective objects.
{
"Customers": [
{
"[?Instruction?]": "[?Record?]",
"ID": "[?Source?]",
"Name": "[?Source FullName?]",
"Status": "[?Source CustomerStatus?]",
"Emails": [
{
"EmailAddress": "[?MultiSource?]",
"Type": "[?MultiSource?]",
"Unsubscribe": "[?MultiSource?]"
}
],
"PhoneNumbers": [
{
"AreaCode": "[?MultiSource?]",
"PhoneNumber": "[?MultiSource?]",
"Type": "[?MultiSource?]"
}
]
}
]
} Conversion Preview
In the Conversion Preview section of the Import Manager's Select Format step, the template results in the values from the "Emails" and "PhoneNumbers" objects in arrays being concatenated with a semicolon separator. There are three email addresses and two phone numbers in the JSON, based on the semicolon-separated values in each column.
Click the Sample reload button  . The Conversion Preview area displays the results of the input document against the provided template.

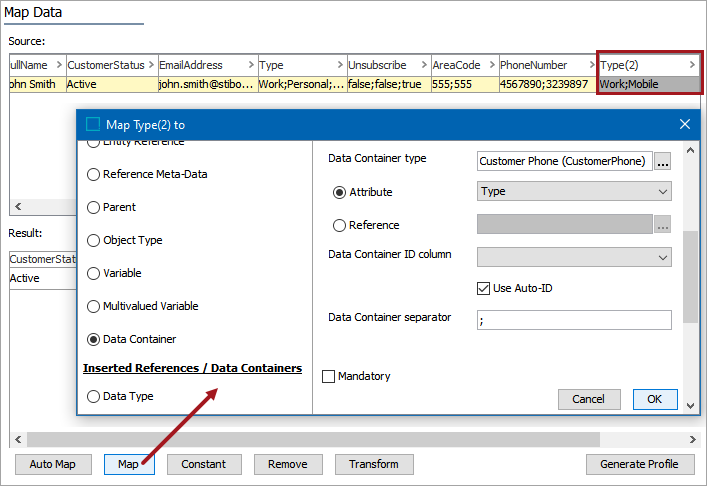
After clicking the Next button, the mapping step is presented where the ID, Name, and Status attributes have been mapped. To map the next three columns, the Data Container mapping uses the same Data Container type that is relevant for Customer Email addresses.
On the 'Map Email Address to' dialog, select the relevant attribute, check the 'Use Auto-ID' checkbox, and change the Data Container separator from the default of '#' to ';'. Click OK and the values are recognized as multiple rows in the data container. The same process is used for the next two columns, with relevant attributes selected.

In the next three columns, make mappings related to the Customer Phone Numbers using a different Data Container type. When switching types, the separator resets to the default.
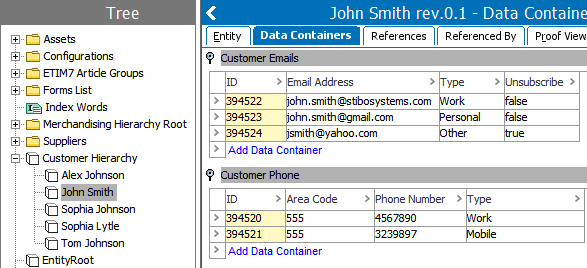
When the import completes successfully, the new Customer is created with data containers populated as defined in the JSON document: