The Change Package Git Delivery method allows integration with popular repositories, supporting the HTTPS (token-based) or the SSH (file-based) access methods for GitHub, GitLab, and Bitbucket.
The Change Package Git Delivery method delivers files produced by the OIEP processing engine using an integrated STEPXML Splitter to deliver multiple files to a branch in a remote Git repository. Refer to https://git-scm.com for more information about Git.
The change package is represented below the specified branch within a configurable directory structure. At the end of the directory structure, change packages grouping files by the Primary and Secondary sections, then by type of object with XML or JSON files named by object type and the ID of the object.
Note: The remote repository cannot be empty. At least one branch with one file must exist (e.g., the 'main' branch and the README.md file).
Prerequisites
Important: Prior to configuration, dropdown parameters that rely on a property are empty. Hovering over the dropdown or clicking a dropdown displays the required property name to configure. To display the value(s), in the Self-Service UI, select the environment, and on the 'Configuration properties' tab, configure the property for your system. Refer to the Self-Service User Guide for information about setting configuration properties, including the use of the ${CUSTOMER_SECRETS_ROOT} and ${CUSTOMER_CONFIG_ROOT} variables.
Multiple entries can be added to the dropdown parameters using dynamic properties. Each configuration entry must have a unique integer or alpha identifier (indicated by [*]) as described below. When duplicate identifiers exist, only the last value is displayed in the dropdown.
Allow a few minutes for changes made in the Self-Service UI 'Configuration properties' tab to display in the workbench.
Prior to configuring the Change Package Git Delivery method, configure data for the following dropdown parameters:
-
Configure the Remote Git Repository URI parameter using the ChangePackageGitDelivery.RemoteRepoUri.[*] property. For example:

Note: For internally hosted Git setups, ensure that any firewall access rules, IP whitelisting, or ports (tcp/22 or similar) are configured to allow the STEP server(s) to access the needed Git repository.
-
Configure the Git Branch parameter using the ChangePackageGitDelivery.Branch.[*] property. This defines the name of the branch or the template that identifies the branch to which the delivery is published. For example:
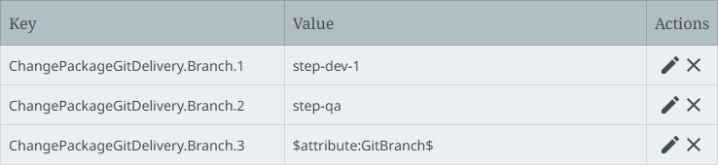
Templates can be used to define the location of the branch, along with an attribute. As shown in the 'ChangePackageGitDelivery.Branch.3' entry in the image above, a 'GitBranch' attribute on the change package with possible values of DEV, QA, PRE-PROD, or PROD indicates the desired branch in a single property.
The available templates are:
-
$systemname$ - system name, where the change package is sealed
-
$changepackageorigin$ - origin, where the change package was initially created
-
$changepackageuniqueid$ - system-defined unique ID
-
$changepackageid$ - user-defined change package ID
-
$attribute:attributeid$ - For additional flexibility, custom description attributes that are externally maintained, not dimension dependent, not calculated, and not multi-value can be added to the change package object and referenced in the template to create subfolders based on values you define. When a custom attribute is used in the directory template, values must be present and LOV validation base type is recommended.
Note: a-z, A-Z, 0-9, -, and _ are supported characters for static text. Other characters are replaced with an underscore.
-
-
Configure the Repository User Name parameter using the ChangePackageGitDelivery.RemoteRepoUsername.[*] property. This property supports authentication via HTTPS with PAT entered in the Repository User Password parameter on the dialog (discussed in VCSI: Supported Authentication Methods per Git Service in OIEP). For example:

-
Configure the Path to Private Key When Using SSH parameter using the ChangePackageGetDelivery.SshPrivateKeyUri.[*] property. For example:

Configure SSH Connection
-
To connect via SSH, the Path to Private Key When Using SSH parameter defines the remote repository RSA SSH private key generated using the old OpenSSH format and ed25519. The generated key file must be uploaded via the Self-Service UI 'Configuration files' tab.
Important: PuTTYgen (.ppk) SSH keys are not supported by STEP. Using an unsupported key type results in an 'invalid private key' error.
Follow these steps to generate a valid private SSH key:
-
Use ssh -V to check the version on your system and then generate a key.
-
With OpenSSH versions prior to 7.8, use the following command to generate the new OpenSSH format key:
ssh-keygen -t rsa -b 4096 -C <comment> -f <keyfile_name>
For example:
ssh-keygen -t rsa -b 4096 -C john.smith@acme.com -f git_rsa4096_key
-
With OpenSSH versions 7.8+, generated keys default to the new OpenSSH format. To generate keys in the old format, use the following command:
ssh-keygen -t rsa -b 4096 -C john.smith@acme.com -m PEM -f git_rsa4096_key
Important: While the general approach and commands are the same with later versions of OpenSHH, the -m PEM argument shown above is needed with versions 7.8+.
-
-
Add the public version of the SSH key (for example, git_rsa4096_key.pub) to your GitLab or Bitbucket account. Failure to add the public key to your account results in a 'Not authorized' error.
For a general overview of supported authentication methods, and details on GitHub and Bitbucket, refer to the VCSI: Supported Authentication Methods per Git Service in OIEP topic.
-
-
Configuration
For information on a parameter, hover over the parameter field to display help text.
Note: The parameter dropdown options are defined by the properties outlined in the Prerequisites section above.
-
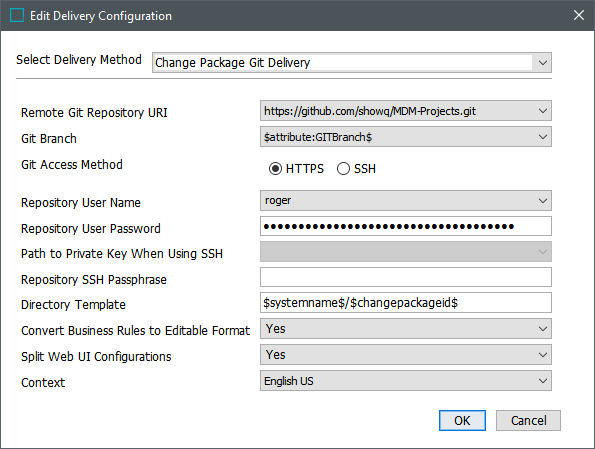
On the Configuration tab, in the Delivery Method area, click Edit Delivery.
-
In Select Delivery Method, choose Change Package Git Delivery.
-
In Remote Git Repository URI, select a URI from the dropdown for the relevant remote repository.
-
In Git Branch, select a defined template or a branch in the associated remote repository.
-
In Git Access Method, select HTTPS or SSH and provide additional values as required.
-
For HTTPS (using Basic authentication or Personal Access Token (PAT)):
-
In Repository User Name - select an option from the dropdown.
-
In Repository User Password - add the Basic authentication password, or add the PAT generated from your repository developer tools. Password must be entered directly when configuring the delivery method for these authentication methods.
-
-
For SSH:
-
In Path to Private Key When Using SSH - select the file path to the private key from the dropdown.
-
In Repository SSH Passphrase - add the passphrase.
Note: Author name and email for the Git commit are sourced automatically from the user object associated with the sealing event on the change package and does not require explicit configuration in the delivery method. However, to support this functionality, email address values must exist for users that seal change packages that are integrated with Git.
-
-
-
In Directory Template, indicate where to store files on the repository using a standardized format. While editing the Directory Template, hover over the field to display the available macros.
Use static text, macros, and the forward slash character as a separator to automatically create directories and organize change packages by:
-
$systemname$/$changepackageid$ - default, creates a directory under the branch for each system name where a change package is sent from and sub directories with the ID of the change package.
-
$systemname$ - system name, where the change package is sealed
-
$changepackageorigin$ - origin, where the change package was initially created
-
$changepackageuniqueid$ - system-defined unique ID
-
$changepackageid$ - user-defined change package ID
-
$attribute:attributeid$ - For additional flexibility, custom description attributes that are externally maintained, not dimension dependent, not calculated, and not multi-value can be added to the change package object and referenced in the template to create subfolders based on values you define. When a custom attribute is used in the directory template, values must be present and LOV validation base type is recommended.
Note: a-z, A-Z, 0-9, -, and _ are supported characters for static text. Other characters are replaced with an underscore.
-
-
In Convert Business Rules to Editable Format, select an option:
-
Yes - default, sends editable JSON files of business rules (actions, conditions, functions, and libraries) to the repository. The JSON files can be imported manually or with other files combined in a .ZIP file that is sent to an IIEP using the STEPXML Joiner pre-processor.
-
No - exports STEPXML files that do not provide editable JavaScript access but can be imported as-is after export and include definitions as comments.
-
-
In Split Web UI Configurations, select an option:
Refer to the Split Web UI Configuration Results section below for examples.
-
Yes - Web UI screens and the header.xml (theme and login screen) are available as individual files in Git. This allows individual elements (such as a single screen) to be changed and imported rather than importing the complete Web UI. This option is useful for DTAP environments where not all Web UI screens are ready to be promoted at the same time.
-
No - default, creates each Web UI as its own STEPXML file, encodes it as Base64, and uses GZip to compress it. Web UIs delivered using this option must be imported as a complete object.
-
-
In Context, select the context to include in the files generated by the STEPXML Splitter pre-processor. This is the context that is used upon import of the change package with the STEPXML Joiner for Change Packages pre-processor on a target system when the Context is derived from input files and not set explicitly in the pre-processor options for Import Context.
-
On the Edit Delivery Configuration dialog, click the OK button to save the delivery method.
Split Web UI Configuration Results
In the following images, the same Web UI is exported to Git once with the Split Web UI Configurations parameter set to Yes and again with the parameter set to No.
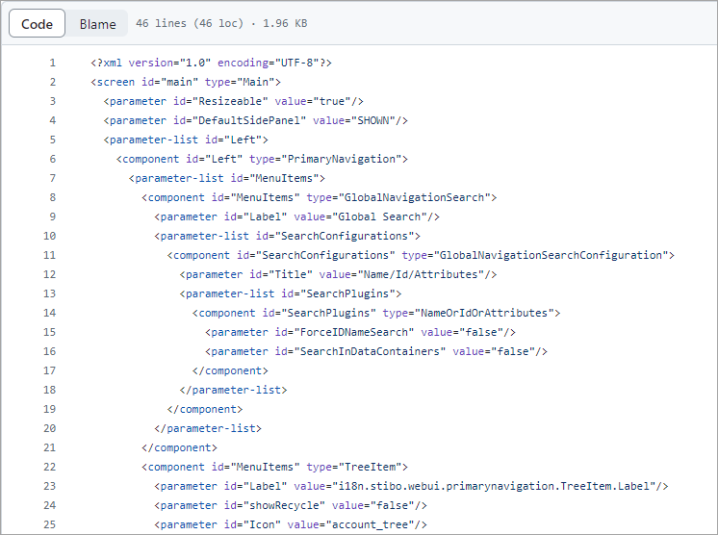
When the parameter is set to Yes, the change package is displayed in the Git repository as shown below.
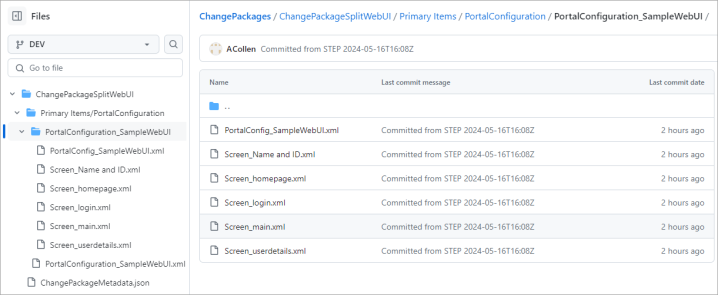
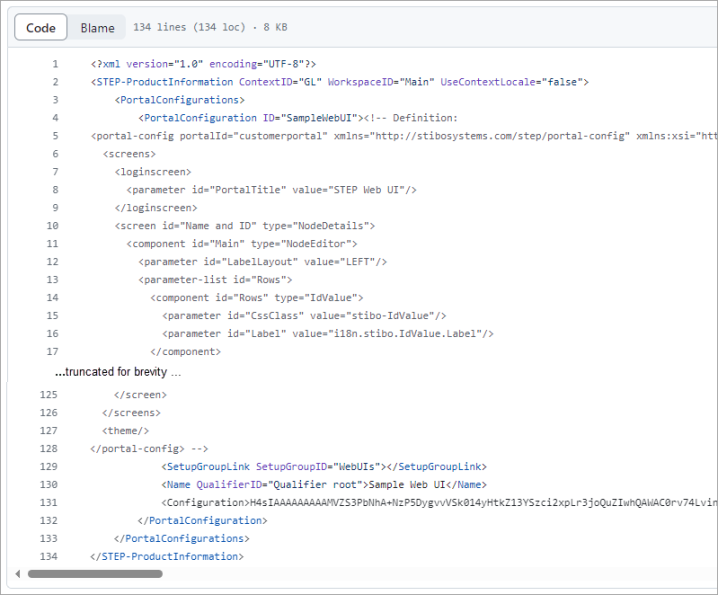
A truncated example of the 'Screen _main.xml' code is as follows:
When the parameter is set to No, the change package is displayed in the Git repository as shown below.
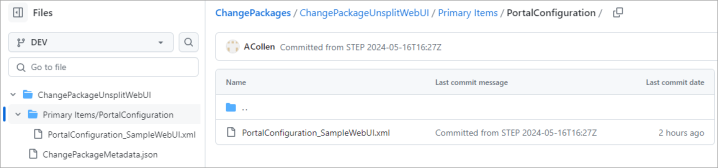
A truncated example of the 'PortalConfiguration_SampleWebUI.xml' code is as follows: