Microsoft follows a different integration approach than what is used for the visual integrations between STEP and Tableau or Qlik. Power BI requires the use of Microsoft's API to authenticate, show, interact with, and filter reports.
The visual integration between STEP and Power BI uses an 'app owns data' scenario instead of 'user owns data.' As a result, individual users who log into the Web UI to view Power BI information do not need a Power BI account; STEP is configured with the relevant credentials to authenticate the Power BI service.
Note: Though individual users do not need a Power BI account to view Power BI information in the Web UI, a licensed instance of Power BI is required for the visual integration with STEP.
Service Principal Authentication Setup Overview
The visual integration between STEP and Power BI uses the service principal method of authentication, which allows the application (in this case, STEP) to log in to the Power BI service on behalf of the user that is using service principal credentials. The service principal authenticates the application by using an application ID and an application secret and is configured with properties added to the sharedconfig.properties file on the STEP application server.
A general overview of how to set up Power BI using the service principal is as follows. For more detailed information, refer to the following Power BI help page: https://docs.microsoft.com/en-us/power-bi/developer/embed-service-principal#get-started-with-a-service-principal.
- Set up Power BI with the service principal in Microsoft Azure Active Directory (AD). In AD, you will perform tasks that including the following:
- Register a server-side web application to use with Power BI.
- Create a security group and add the application you created (e.g., Stibo Power BI Embedded) to that security group.
For more information, refer to the following Microsoft Azure AD help page: https://docs.microsoft.com/en-us/azure/active-directory/fundamentals/active-directory-groups-create-azure-portal.
- As a Power BI admin, enable service principal in the Developer settings in the Power BI admin portal. To access the Power BI admin portal, visit: https://app.powerbi.com/admin-portal.
Note: To become a Power BI admin, users must belong to the Power BI administrators group in Microsoft Azure.
- In Power BI, set up your Power BI environment and add the service principal as an admin to the relevant Power BI workspace. For more information, refer to https://docs.microsoft.com/en-us/power-bi/developer/embed-service-principal.
- Configure STEP to connect to the Power BI Service using the service principal. This is done by adding the configuration properties listed in the next section of this topic to the sharedconfig.properties file on your application server.
Configuration Properties
The following table explains the configuration properties required to enable authentication between STEP and Power BI.
| Configuration Property | Description |
|---|---|
|
PowerBI.TenantID |
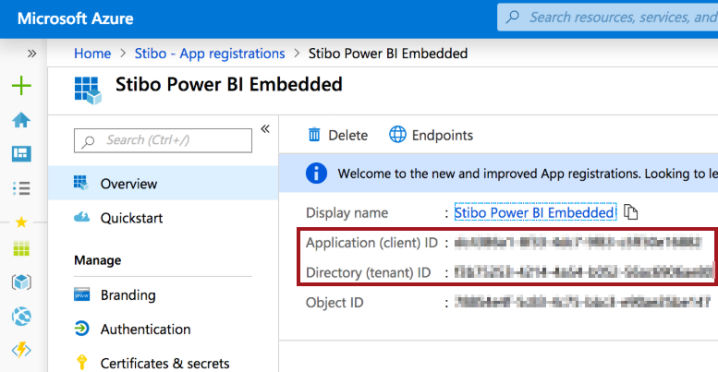
Power BI Tenant ID. This should be set to the 'Directory (tenant) ID' specified on the Overview screen of the App Registration in Azure Active Directory. |
|
PowerBI.ServicePrincipal.ClientID |
Power BI Service Principal Client ID. This should be set to the 'Application (client) ID' specified on the Overview screen of the App Registration in Azure Active Directory. |
|
PowerBI.ServicePrincipal.ClientSecret |
Power BI Service Principal Client Secret. This should be set to the value of the Client Secret specified on the 'Certificates & secrets' screen of the App Registration in Azure Active Directory. |
The below screenshot illustrates where to locate values for the PowerBI.TenantID and PowerBI.ServicePrincipal.ClientID configuration properties in the Microsoft Azure interface: