PDX Channels setup
Instrument allows users to view, add, and remove PDX channels for one or more products in a perspective table view. This enables you to easily check if products are assigned to the desired PDX channels. If the products have not been assigned to the desired PDX channels, you can add or remove PDX channels to ensure that products will be syndicated to the correct receivers via PDX.
Furthermore, the PDX channel solution in Instrument supports business processes to be executed before the actual syndication to PDX takes place. This is triggered via a business action that will run when channels are either added or removed. The business action could, for example, initiate the selected products into a STEP workflow or do data quality checks and then ultimately ensure that the products get sent to PDX. Once the products are received by PDX, configured channel assignment rules will ensure that the products are assigned to the desired channels. Assignment rules must be configured in PDX.
To use the PDX channel functionality, a PDX Inbound Integration Endpoint and a PDX Outbound Integration Endpoint must be set up, and users must have the Product Data Exchange Syndication commercial license enabled. For more information on PDX, refer to the Product Data Exchange Syndication topic section in the STEP Documentation.
Adding a PDX channel
To add a PDX channel to a product:
-
Select one or more products in the table. After a product has been selected, the PDX channels button on the toolbar will be enabled.

-
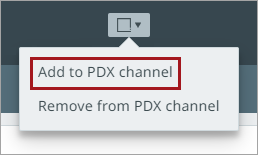
Click the PDX channels button.
-
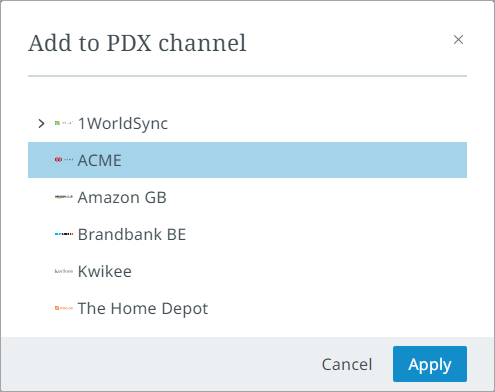
Select "Add to PDX channel." A dialog listing available PDX channels will display.

Note: PDX channels are available according to the current user. Channels may differ based upon the PDX channels available to each user.
-
Select the appropriate PDX channel. After selecting the channel, the "Apply" button will become enabled.

-
Click "Apply" to add the product to the selected PDX channel. A notification will display in the upper-right corner of the screen stating, "Background process to update PDX channels has started." When the background process has finished, another notification will display stating, "PDX channels were updated." To add more channels, repeat steps 4 and 5 as needed.

Note: When a channel has been added or removed, a business action will run. The type of business action triggered (quality check, workflow, etc.) is set by the user. Business actions must be set up in STEP Workbench. For more information on business actions, refer to Business Actions topic in STEP documentation.
Removing a PDX channel
To remove a PDX channel:
-
Select one or more products from the product table.
-
Click the "PDX channels" button in the toolbar.
-
Select "Remove from PDX channel".
-
When the PDX dialog list displays, select the channel to be removed.
-
Click "Apply." A notification displays in the upper-right corner of the screen stating, "Background process to update PDX channels has started." Once the background process has finished, another notification displays stating, "PDX channels were updated." The channel status then changes to "Waiting to be removed". When the cursor hovers over the channel, a message displays stating, "Channel marked for removal."
Note: The channel displays until channel removal confirmation has been received by STEP from PDX.
If an error notification displays in the upper-right corner, click the "Go to perspective" link inside the message. The table displays a red marker next to the product with the error. Hover the mouse over the marker to display the error message. Your system administrator must make appropriate updates in STEP to fix the error.
Available PDX table columns
PDX table columns can display in bulk view for product managers to review channel statuses across multiple products in a table. This enables users to see, in a single view, when products have been syndicated successfully, added or removed from a channel, as well as other PDX channel status updates.
The two types of columns are:
-
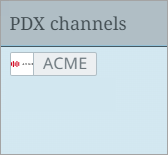
PDX Channels: this column shows all the elected channels for a product. Each channel is displayed with a chip.
-
Individual status columns: These columns are used to select a status column for a specific channel. Once selected, the column displays the status for a product in the channel.
You can also add and change channel columns using the Customize view option. Admin can add the columns using the Configuration tool.
PDX Channel status
When the mouse hovers over a channel, the status displays in a tooltip dialog. Each column in the table displays a product's channels and current statuses.
PDX Channel statuses:
-
Progress: The product is missing mandatory attribute values
-
Ready: All mandatory attribute values are present
-
Submitted: Product sent. No response (yet)
-
Rejected: Product failed pre-flight validations
-
Returned: Product failed validations by the channel
-
Accepted: Channel accepted the product received
-
Multiple: The product has multiple statuses depending on the receiver
-
Fetching: Fetching the retailer’s version of the product record
-
Waiting to be added to channel: The product has been added to a channel in Instrument, but is waiting to be added in PDX.
-
Waiting to be removed from channel: The product has been removed from a Channel in Instrument, but is awaiting the removal in PDX.

Each status displays with a specific icon, shown in the above example.
Important: You should never manually manipulate PDX data containers in STEP. Doing so could result in functionality errors for both PDX and Instrument.
Executed business rules after adding and removing channels
Once you make a change to the target channel list for a product (adding or removing channels), a business rule will run. This allows customers to customize actions triggered. For example, this could be a business rule that triggers a STEP workflow where data quality checks and additional data maintenance can be conducted. The ID of the business action must be configured via the below properties:
-
PDX.BusinessAction.AddChannels=
-
PDX.BusinessAction.RemoveChannels=
Note: For on-prem systems, properties shown in this topic should be added to the sharedconfig.properties file. For SaaS systems, properties are set within the Self-Service UI by going to the Configuration Properties tab for your system. If the properties you need are not shown, submit an issue within the Stibo Systems Service Portal to complete the configuration.
The purpose of business actions is to ensure that desired business processes (like running workflows and performing data quality checks) are executed. Also, the business action allows updates to an attribute with the added / deleted channels. Having such an attribute on products is helpful for users to utilize the channel assignment rules in PDX. The attribute must be added to the products separately and must also be syndicated to PDX. After syndication, the PDX channel assignment rules must be configured to use the attribute.
Important: The actual export of the product data to PDX via the PDX Outbound Integration Endpoint can be triggered via creating a derived event or an approve event.
"PDX Channel Context" bind for Business Rules
The PDX channels context bind allows administrators to access information about PDX channels that can be added and removed within the Instrument UI. To assist administrators in creating JavaScript based business rules for this purpose, a number of methods for the PDX Channels Context bind are available. Reference the PDX Channels Context Bind topic in STEP Documentation for more information.